...
Property
...
Values
...
Comments
...
Field
Name of Field
(read only)
...
Original name of the field.
...
Source
Step Name
(read only)
In which step did this field originate in the Query Object.
...
The Format step primarily lists all fields provided by the selected Query Object.
The Format step is generally the last step of the Query Object workflow. It specifies the caption, group label, etc., and acts as the business view of the Query Object.
...
Figure 9: Format Step
For each field on the Format step, the following properties are set:
Step is a key step in the Query Object workflow, typically used as the final step. It primarily defines how the fields in the query are displayed and organized for the end users. It allows you to set field captions, group labels, formatting, and other display properties to ensure the data is presented in a user-friendly format.
...
Key Properties in the Format Step
Field
Name of Field: This is the original name of the field, which is read-only.
Source: This specifies the step from which the field originates. It helps trace each field’s source in a complex Query Object.
Caption
Enter
...
: This is
...
the field
...
's display name as seen by users in reports. You can customize it for readability or clarity.
Hyperlink
...
Options:
URL: You can set the field to open a URL.
Drill Down to another Report
...
Detailed steps of specifying hyperlink is mentioned below in a separate section titled “Hyperlinking a Field”
...
Group Label
...
Enter or Select from list
To create a new group, type the new group name.
To put this field into an existing group, select group name from the drop-down list.
...
: Configure the field to drill down into another report based on a parameterized link.
The hyperlink properties also allow defining the target frame (new window, same frame, etc.) and the parameters passed to the drill-down report.
Group Label
Enter or Select: This allows you to group fields together. For large datasets, categorizing fields into groups can improve readability and navigation.
Hidden
Select/De-select
...
Select = makes this field invisible to users for reporting process.
...
: Allows the field to be hidden from the report or from subsequent Query Objects that use this Query Object as a data source.
Geographic Role
Enter
...
or select from list
...
Select = This field has GIS classification data such as country names, state or city names.
GIS enabled field will appear in selection list for grouping option in GIS mapping visualization screens
...
Format
...
Width
...
Number 1-100
...
Default width of this field when dragged onto a report
...
Output Format
...
Format String
This field value will be formatted using this format string.
Useful for Date and Number formatting.
If you need to decide the format string at run time, then select “Apply Locale Default” property in the Format String selector dialog.
You can specify hh:mm:ss to treat numeric values as seconds and convert the seconds into hours:minutes:seconds format in smart/ad hoc/ studio report output and exported report also
...
Align
Left,
Right,
Center
...
This field, when put on a report, its values will be aligned to the selected side by default
...
Input Format
...
Format String
This format string decides the prompting format for the value for this field on Ad hoc Filter screen.
This is useful in prompting date values in desired format.
This is also used to input IP Address format for number values.
For details on Output/Input Format, refer the below section titled “Data Format Dialog”
...
User Time Zone
...
Select Time zone
Specify the time zone in which the date data is to be converted and displayed.
The Report Server calculates the difference between Database Time Zone and User Time Zone and does time conversion.
For deciding User Time Zone at run time, select SYS_USER_TZ value.
In a smart report, if the hyperlink is provided to an external URL and if the external URL does not have the specific permission, then the URL does not open and displays an error message. For example, if the external URL is Intellicus.com and permission has not been given to open this URL, then the error “refused to display ‘https://intellicus.com/”is displayed.
Hyperlinking a Field
A field can be made hyperlink to visit a web page or drill down to another report (parameterized report) at run time. For example,
For a summary report having sales by country, you can hyperlink the country-name so that user can open respective country’s detailed sales report by clicking the country-name.
From within a report, select and open web sites or documents dynamically, based on values used in the URL
...
Figure 10 Hyperlink Options dialog box
Hyperlink Options
URL
You can hyperlink the field to open a specific URL.
The URL is automatically constructed by the “Drill Down to another Report” settings.
You can over write the URL on your own.
For external links such as web links you need to write your own URL text.
Drill Down to another Report
This option enables to hyperlink the field to open a specific report.
Hyperlink Dialog Properties
...
Property
...
Values
...
Comments
...
Select
...
Select Report using Report Selector
...
Report to drill down to
...
Target
New Window(_blank)
Same Frame(_self)
Parent Frame(_parent)
Parent Window(_top)
Opens the drill-down report in new browser window
Replaces the parent report and opens the drill-down report in the same portal tab
Opens the drill-down report in new Intellicus portal tab
Replaces the Intellicus portal and open the drill-down report in the same browser window.
...
Report Parameter
...
Parameter of the drill-down report
...
Report Parameter is the parameter in the report being set as hyperlink.
...
Report Parameter Value Field
...
Select field from this report
...
Select the field whose value is to be passed to drill-down report as the selected parameter value
...
System Parameter
...
Select from list
...
Select if you need to pass system parameter from this report to drill-down report
...
System Parameter Value Field
...
Select value
...
For each system parameter you choose to pass, relevant values for that system parameter populates in the list automatically. You shall choose the desired value. To know more, refer System Parameter(s) and their value(s)
Data Format Dialog
Data Format dialog is used to set the format of the field upon clicking icon. As an alternate, you can also type-in the format string in the Output/ Input Format text box.
Data Format dialog properties:
...
Format
General
Number
Currency
Date
Time
Percentage
Scientific
Text
Network Id
Specifies various formats of data for input or output.
...
General
...
No specific format to apply to the data.
...
Number
...
Treat the data with number validations as given below.
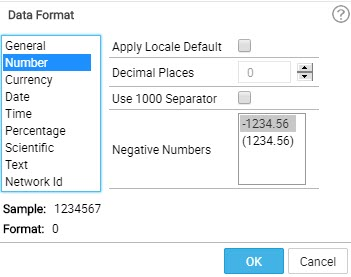
Apply Locale Default = Instead of providing a fixed format here, pick the format from Localeconfigurations.xls for user’s current selected locale or the default settings
Decimal Places = maximum number of decimals allowed in input
padding or rounding up to these many decimals in output
Use 1000 Separator = Yes = apply thousand separators in output
Negative Numbers = whether to enclose in braces or prefix with minus
Currency
...
Treat the data with currency validations as given below.
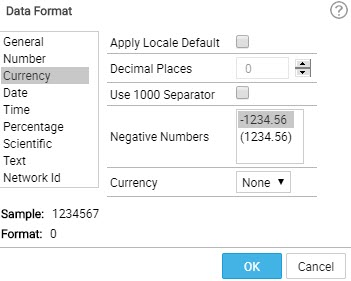
Apply Locale Default = It picks the format from Localeconfigurations.xls for user’s current selected locale or the default settings
Decimal Places = maximum number of decimals allowed in input
padding or rounding up to these many decimals in output
Select: Use 1000 Separator to apply thousand separators in output
Negative Numbers = whether to enclose in braces or prefix with minus
Currency = Select currency symbol/chars to prefix
...
Date
...
Treat the data with date validations as given below.
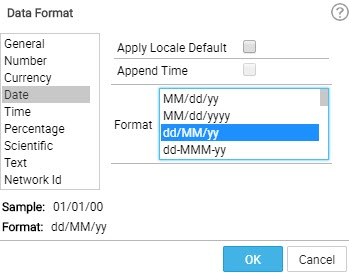
Apply Locale Default = Instead of providing a fixed format here, pick the date format from localeconfigurations.xls for user’s currently selected locale or the default settings
Append Time = Append the time format from the localeconfigurations.xls and create date + time format string for user’s currently selected locale
Format = Select a format string from the fixed formats’ list (Some formats may not be supported by the calendar control that helps end user to fill the date value)
In case you need a fixed format date + time input or output formats, select the format strings that contain both date and time parts
...
Time
...
Treat the data as time part only.

Apply Locale default = Instead of providing a fixed format here, pick the time format from localeconfigurations.xls for user’s currently selected locale or the default settings
Format = Select a format string from the fixed formats’ list (Some formats may not be supported by the calendar control that helps end user to fill the date value)
...
Percentage
...
Treat the data as percent division so multiply by 100.
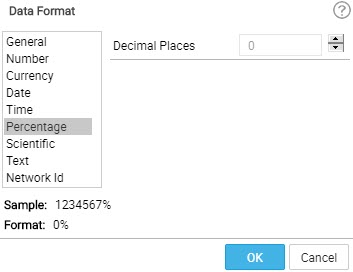
Decimal places = Decides number of decimal places in the output
...
Scientific
...
Treat the data as a big number that needs conversion into scientific format.
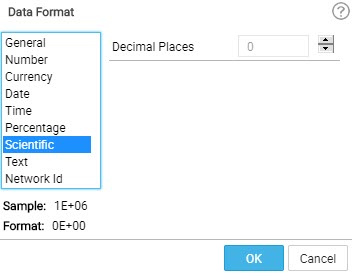
Decimal places = Decides number of decimal precision places in the output
...
Text
Process the text data according to the format string.
Formats = Select format types as:
...
Lower Case = Convert text into all lower case
Upper Case = Convert text into all upper case
...
Network ID
...
This format is applicable on number fields. This format treats the number 32bit IP number and converts to respective IP display formats.
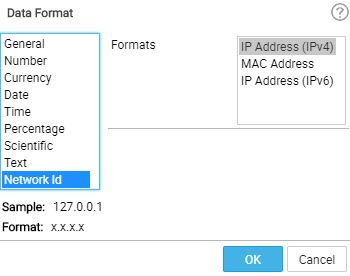
Formats: Select format types as:
IP Address (IPV4) = Converts user entered dotted quad notation IP address into 32-bit IP number in input fields.
Converts 32-bit IP number into quad dotted notation of IP address in output fields
MAC Address = Converts user entered MAC address string into its EUI-48 number in input fields.
Converts EUI-48 number into its MAC address string in output fields.
Note: The path for locale configuration file is:
Folder: <Install Dir>ReportEngineConfigi18n
File: localeconfigurations.xls
...
: If the field contains GIS data (e.g., country names or coordinates), it can be mapped to geographic roles for use in mapping visualizations.
Format
Width: Specifies the default width of the field when added to a report (values range from 1-100).
Output Format: Defines the format string for how the field’s data will be displayed (e.g., date, number, currency).
Align: Aligns the field’s data (left, right, or center) when added to a report.
Input Format: Defines how the data will be prompted (useful for filtering or entering date/IP address formats).
User Time Zone: Specifies the time zone for date fields, allowing for conversion and display according to the user's time zone.
Hyperlinking a Field
You can configure a field to act as a hyperlink, enabling users to navigate to other resources or reports directly from a field's value. For example, in a sales report, you could hyperlink the country name to open a detailed report for that specific country.
Hyperlink Options:
URL: The field will open a specified URL when clicked. This is often used for external links.
Drill Down to another Report: The field can link to another report, passing parameters for detailed views. This is common for multi-level reporting.
Hyperlink Dialog Properties:
Select Report: Choose a report to drill down into.
Target: Define where the report will open (e.g., new window, same window).
Report Parameter: Map a parameter from the current report to the drill-down report.
System Parameter: Pass system parameters from the current report to the drill-down.
Data Format Dialog
The Data Format Dialog allows you to specify how the field’s data should be formatted for input and output.
General: No specific format.
Number: Allows validation and formatting of numbers, including options for decimal places and thousand separators.
Currency: Format as currency, with options for symbols and decimal places.
Date: Format the field as a date, with options to append time or choose a locale-specific format.
Time: Formats the field as a time value.
Percentage: Treats the field as a percentage, multiplying by 100.
Scientific: Formats large numbers in scientific notation.
Text: Allows you to convert text to lower case, upper case, or apply other text formatting.
Network ID: Format for IP addresses and MAC addresses.
Locale Default:
You can apply the locale default format by selecting it from a locale configuration file, which ensures the format aligns with the user's locale settings.